Drafting a Custom Neck Hole Pattern
This is intended as a kind of add-on to my previous post on how to do a facing. When I've taught the facing class in person we've often done this in class when other people were available to help measure.
For years I would search the house looking for random bowls, dishes, or other round-ish objects that looked like they might be the right size for whatever size neck hole I needed at the time.
Finally, while putting together my first facing class I decided to come up with a more definite method than "find something round-ish and kinda the right size,squint at funny and trace around it."
And this is what I came up with. This is specifically for a key-hole style neck hole, which is a generally a circular neck hole with a slit down the front (although the slit can go almost anywhere depending on period, style and whim.),and is suitable for many early period tunic style garments
What you'll need:
Cloth measuring tape
Paper or card stock (to make final pattern out of)
Scrap paper or fabric (to play around with the size and shape of your neck hole)
Pencil
Marker
Calculator
What you'll need:
Cloth measuring tape
Paper or card stock (to make final pattern out of)
Scrap paper or fabric (to play around with the size and shape of your neck hole)
Pencil
Marker
Calculator
The Neck Hole How To:
First: To determine the size neck hole you need, start by measuring around the base of the neck of the person you are making this pattern for.
Add 4 inches to this measurement.
This is you minimum neck hole circumference. You can make it bigger, but do not go smaller.
Next we need to figure out what length the slit should be.
Measure the head at its widest part, including ears and nose.
Subtract the Minimum Circumference from this measurement.
This is your minimum slit length
Again:
Neck measurement + 4 inches = min. neck hole circumference
Head measurement - min. neck hole circumference = min. slit length
This gives you the smallest size opening you can get away with and still have it fit over the persons head and lay well around the neck.
That's it for the math lesson. Now we can start drafting!
From here you can play! Maybe you want a wider neck hole to show off some of the under tunic, or a longer slit so you can have an excuse to use those cool looking buttons you found on sale...go for it! Play with some scrap paper or fabric and see what you like.
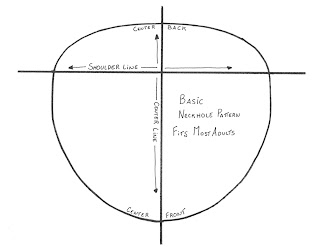
You may have noticed that my Basic Adult Neck Hole Pattern (pictured above) is not a perfect circle.
It's actually kind of funny shaped. This is the shape I have found works the best on the widest variety of people and garments. However, do not feel you have to make your neck hole pattern this shape. Circles work just as well in most cases, and make it a lot easier to trace around that salad bowl you have that just happens to be the right circumference for your neck hole. ;)
Once you decide on your neck hole size and shape, cut it out of your good paper or card stock.
Fold the cut out in half lengthwise and press in crease.
While still folded in half, fold it again about 1.5 to 2 inches down from the top edge and press in crease.
Unfold and...Ta-Da! Custom neck hole pattern!
The creases you just marked on your pattern are going to correspond to the creases you put into your facing fabric, making it very easy to place everything just right. I like to mark these creases with a marker once I finish my pattern, just to keep things easy to see.
A note about the second crease line, which marks the shoulder line:
The neck holes placement on the shoulder can really effect the look of a garment and how well it will hang on the person wearing it. If you put the neck hole to far forward of the shoulder line it can cause the shoulders of the garment to sit forward of the persons shoulders, giving a hunched look and causing the pattern to bunch funny. If you place the neck hole to far back on the shoulder line then the garment can feel like it's always slipping off and needs constant readjusting.
The ideal placement for the neck hole on the shoulder line really depends on each individual, and the best way to find it is to make mock ups out of cheap fabric and play around with different placement's.
Fortunately, this is really only necessary when making garments for someone with a very pronounced curve to there back or very sloped shoulders, or whose neck very obviously sits forward of there shoulders. This can sometimes be caused by very developed shoulder and upper back muscles. ( Picture "Ahh-nold" Schwarzenegger or Bruce Li...or your average quarter back with a "bull-neck".)
Happily, for the vast majority of people, I've found that about an 1.5 to 2 inches works just fine.

Thank you for your help.
ReplyDeleteThis was so helpful!
ReplyDeleteFINALLY! I have been looking for something like this for yonks and have been just proper flustered, like. Now I can finish the prototype tunic I started, and get back to making my own clothing. Cheers love!
ReplyDeleteThis was super helpful!
ReplyDelete